
With the use of mobile devices on the rise for the past decade or so, many claim the desktop PC is on the track to becoming a relic of computing past. There are many factors that control this outcome. Smartphones and tablets, allow users to browse the internet, manage email, and post to social media […]

In a hard shutdown, the computer has not had the opportunity to shut down properly. Any updates, or programs that are running in the background are abruptly forced to shut down. Data loss, incomplete installations and suspension and corruption of any processes that were running before the shutdown are some of the outcomes of a […]

Just like the “real world,” the internet has some dangers children need to be made aware of. From inappropriate content, to less than kind comment sections to outright predators, there are plenty of things to make a parent nervous about allowing their child in the cyber world. The good news, is there are plenty of […]
Getting rid of an old computer (How To)
1) Transfer files you wish to save: The best way to do this is by using a cloud service such as Google Drive, Dropbox, or Microsoft OneDrive. You could also use an external hard drive. Transferring files can be a tedious task, if you don’t have the time and are in the Buffalo, New York area, we’d be happy to do it for you.
2) Delete sensitive files like bank account information, tax information, medical files, or anything else that gives away personal data.
3) Deauthorize your computer; Many might not think about this step. Some programs and software only allow a certain number of devices to be authorized for use. Be sure to deauthorize the old to make room for the new.
4) Uninstall Programs. Microsoft Office for example may contain information like your name and address.
5) Wipe your hard drive. For PCs, once you’ve gone through and removed the data you know is there, it’s time to wipe the drive to ensure you’ve removed all of your personal files and software programs. If you just plan on recycling your hard drive skip to 6, If you plan on reusing or donating the computer/hard drive read on.
How to Wipe a Hard Drive Using DBAN
a. Download DBAN from the official site. The version number you see might be different than what’s in this image. DBAN comes as an ISO file which is meant to be burned to a CD. If you try to open it on a computer, it won’t work. You can download the file on any computer. It does not need to be the one you’re trying to wipe.
b. To use DBAN, burn the ISO file to a CD. But you can’t do it in the normal way that you burn files to a disc. You’ll have to use a special program that will unpack the ISO and burn it properly such as Free ISO Burner. When you’re done burning the CD, label it so you don’t forget what it is. You can also create a bootable USB flash drive from the ISO file as well, instead of using a CD. But keep in mind that it will erase everything on the flash drive. If you’d prefer that method, you won’t be able to use Free ISO Burner. Instead, try ISO to USB.
c. Remove all external hard drives, USB flash drives, secondary internal hard drives and floppies that you don’t want to get erased. DBAN lets you select which drives you want to scrub but this will eliminate any accidents that might happen. Murphy’s law is always applicable when dealing with computers.
d. This is where it can get tricky. First, put the CD in and restart the computer. If it works, you should see the blue DBAN screen. If it just boots up normally and you never see the DBAN screen, try it again but watch closely as it starts to boot up. Look for something in the corner like “F12 = Boot Menu“. It could also be [F11] or something else entirely, depending on the manufacturer of your computer.
If you don’t press the key in time, you’ll have to reboot and try again. Once you get it, select the CD Drive from the menu that comes up.This is where it can get tricky. First, put the CD in and restart the computer. If it works, you should see the blue DBAN screen. If it just boots up normally and you never see the DBAN screen, try it again but watch closely as it starts to boot up. Look for something in the corner like “F12 = Boot Menu“. It could also be [F11] or something else entirely, depending on the manufacturer of your computer.
If you don’t press the key in time, you’ll have to reboot and try again. Once you get it, select the CD Drive from the menu that comes up.
e. Once you are able to boot to the DBAN screen, press [Enter]. Avoid using the “autonuke” option. This will automatically erase every drive on the computer. It’s best to press Enter instead so you can manually select the drives you want to erase, just in case you left something connected that you didn’t mean to.
f. Highlight the drive you want to erase and press [space]. This will insert the word “wipe” in the selection box. If you have more than one listed, I would suggest turning the computer off, then removing any external hard drives or flash drives you have attached. Then start it up again and make sure you only have one drive listed. That way you know for sure that you’re erasing the right one.
Otherwise, if you’re sure that you know which one to select, just use the arrow keys to highlight and select it with the space bar.
g. Now hold your breath and say a prayer, and press [F10]. This will start the erasure process. How long it takes depends on how large the drive is. In the upper right corner of the screen you will see the estimated remaining time as well as some other statistics. In the lower pane, you’ll see a percentage of completion. Now, If the process goes as intended you will see the word pass in green.
You can then remove the DBAN CD and turn the computer off. And you’re done! However, If you see the word ERROR in red, it means there was a problem erasing the drive and not all the data got scrubbed. Try it again and if it still fails, you may not be able to use DBAN to wipe the drive. Try a hammer instead. (you can not donate after this method.)
6. If you are opting to recycle it, keep in mind that some recyclers will simply take your old machine and ship it over to developing nations where children are often used to scavenge piles of e-waste looking for valuable parts and components.
To avoid contributing to this irresponsible practice, use a recycler that is part of the “e-Steward” network, meaning they don’t export to places like Pakistan or China, and they follow other high standards. Many of them also will reuse and refurbish electronics.
The Electronic Take Back Coalition offers tips for other ways to responsibly offload your electronics if one isn’t located near you. There are also many local nonprofits that would be happy to take it off your hands and put it to good use.
Phew, you are finally finished. Your computer is now ready to be donated or recycled. We get that this can be quite a time consuming process. Remember Computer SOS is here for all your IT needs.
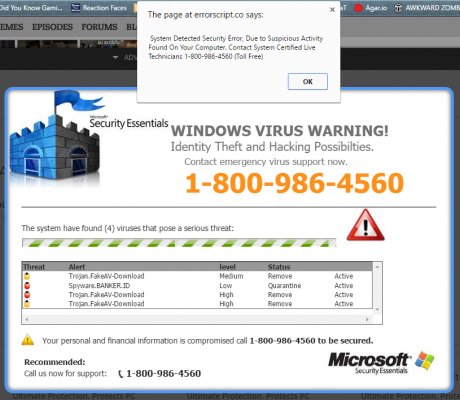
“Systems Warning” Once inside the computer, alters settings and may cause a change to the start page or the default search engine.No matter that adware-type viruses are not considered dangerous, but can’t be called harmless either. They can not only lead you to malicious websites by redirecting your browser and cause misleading ads on your […]

AmazonGo opens its second cashierless store in Seattle. Kroger launches self-scanning pilots, with plans to expand to 400 stores by the end of 2018. Sam’s Club Scan & Go transactions have doubled this year. Today’s retail headlines speak volumes: In-store mobile shopping is here to stay, and growing, as mobile-first customers look for new and […]

As mentioned in our first post in this series, there are three key pillars or components to evaluate when incorporating self-scanning technologies into your enterprise: Strategy Technology Operations Once you have determined your strategy for in-aisle mobile shopping, you can turn your attention to identifying the technologies and, where applicable, the partners to help you […]